| Home | Species | Prints | Technical | Exhibits | Links | Contact |
|
|
|||||||||||||||
| For the technically inquisitive, here's how I make my moth
images.
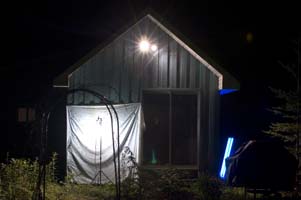
Collecting the moth specimens I've been collecting moth specimens since the summer of 2002. My mobile setup consists of a 110V 15W black light (BL) fluorescent bulb in a small metal fixture. Power is a 12V booster battery and an small inverter. White sheet clipped to a rod clamped to a pair of photographic lighting stands. The light is mounted atop an old tripod with a Bogen Superclamp. Everything fits in a wheeled laundry hamper, which I can load and unload from the car trunk while full. This lets me set up beside the car or in the woods nearby in under 5 minutes. In a single night I might try 2 or 3 different setups. The booster battery has enough juice for several hours on a single change. I've tried using a 110V 175W self-ballasted mercury vapour (MV), but it draws so much power it drains the battery in less than 20 minutes. (In my early collecting days, I plugged the inverter into car's cigarette lighter. I soon discovered just how quickly it drains the battery when I found myself stranded on an abandoned stretch of country road at 3am on a balmy evening in July. I was lucky that a milkman starting his rounds was kind enough to pick me up and give me a lift back to the city.) I use a variety of lights when collecting at a cottage or other fixed location. A 250W clear MV and ballast mounted in a bug-zapper fixture (custom built for me by Sandy Buchanan and Tim Martin of Buchancan Lighting). A 175W self-ballasted frosted MV in a standard workshop light fixture. Two 40W BL fluorescent in an indoor fixture. And two 500W halogens in an outdoor work light assembly. I generally shine the lights against a white sheet. I've experimented with placing the lights in various locations around the cottage and adjacent forest. The MV lights draw best; the halogens by themselves are the least effective.
In the summers of 2003-2008 I rented a cottage on Lac Bonin, Quebec, which is about 25 km (16 miles) due north of downtown Ottawa. The cottage is in a mixed forest, with lots of maple, oak, poplar, birch, beach, cedar, spruce, pine, balsam fir. There are only a few cottages on the lake, and no nearby towns. Light pollution is very low. In addition to the many native wildflowers, the gardens nearby have lilac, rose, raspberry, iris, and daisy. Having a fixed location has allowed me to set up the lights as a moth "trap line" of sorts, and visit it several times over the course of the night. I generally turn the lights on at dusk, which is around 9pm here in June. I don't generally see much of interest for the first hour or so; things start picking up around 10pm. I've had the best luck collecting between 10:30pm and 1:30am. Ed Bruggink from the Biology department at Carleton University has collected (and pinned) many handsome specimens at his cottage on White Lake, Ontario (approx. 30 miles west of Ottawa). Fellow moth photographer Lynn Scott of Dunrobin, Ontario has also collected a number of nice specimens for me. I'm grateful to both of them. Preparing the moth specimens for scanningI patrol the trap line with a flashlight that I can use to inspect the colours and patterns on the moths close up. When I find an interesting specimen in good condition, I collect it in a pill bottle. I put the pill bottle in the fridge until I'm ready to prepare the specimen. The fridge is cool and dark, and this calms the moths down so they don't batter themselves too much. When I'm ready to prepare the specimen, I transfer the moth to a killing jar containing plaster impregnated with ethyl acetate. The fumes quickly overcome it. After 20 minutes (up to an hour for large species), I remove the moth using bent-tipped tweezers, let it air for a minute, and then proceed to spread and pin it. Unlike traditional insect pinning technique, I do not pierce the body. To get a crisp image, I need the moth to lay as flat as possible on the glass of the flatbed scanner. So instead I pin the moth on its back on a slab of styrofoam using strips of glassine. The first strip goes vertically the length of its body, and presses down on the moth to hold it in place on the slab. I then pull one of the forewings forward with the tip on an insect pin until the trailing edge is perpendicular to the body.
I pin it in place, through the wing. Then I do the same for the other wing. Then I pin a vertical strip (sometimes two) on each wing to hold them flat. I then remove the first vertical strip along the body. I use a couple of pins to keep the antennae out from the wings and, when feasible, use a small strip to hold them flat in the same plane as the wings. I run a strip horizontally across the thorax and upper body to hold the the legs somewhat in a plane, using a couple more pins to hold the legs close to the body. I pin several moths on a strip, clearly labeled with the location and date, and leave them to air dry. In my apartment's relatively low humidity (~45%), the small moths dry in about a day; large moths, maybe 2 days. As soon as the moths are dry and their wings are stiff (but before their plump bodies start to shrivel), I unpin them and scan them. Scanning the moth specimens I'm currently using an Epson 4870 flatbed scanner. This scanner has a "native" resolution of 4800 dpi (although some photographers that have measured it believe that 1600 dpi is a more realistic measure of its native resolution). I clean the glass between each scan with a silk cloth. I place a Kodak grey scale off to the side, and lie the moths down in vertical strips. For the first scan I place the moths on their backs with the heads pointing down (i.e., away from the hinge).
I then carefully place a small cardboard box (12x12x12 in) lined with black tinfoil over top of the moths. I make a scan at 600 dpi of the entire arrangement, including the grey scale. For this scan I turn all scanner adjustments off - this is my reference scan, which I refer to later to check for accuracy. I then proceed to scan the individual moths at 4800 dpi. I standardized on a 3:2 aspect ratio, and a fixed set of scanner contrast adjustments that make the background jet black and place the highlights at a reasonable lightness value. These setting do 99% of the time. The exceptions are moths with bright whites, deep blacks, or transparent wings; for these I may need to turn off all adjustments and give special treatment. I'm forced to reduce the resolution, usually to 3600 dpi, for very large moths because the scanner software balks at producing multi-gigabyte files. I save the resulting scan as uncompressed TIFF-format files with names like 20060814-K03A.tif (date "20060814"; background colour "K" for black, "W" for white; specimen number "03"; side "A" for dorsal, "B" for ventral). All of the files for a given night and location go in the same folder with a name like "collected-20060814-lac-bonin". To speed things up, I often scan several contiguous small moths at the same time, and later cut them out using Photoshop. After scanning the moths on their backs, I remove them all from the glass, clean it, and then repeat the whole process with the moths on their bellies. The protruding legs usually prevent me from getting crisp ventral scans; the moth usually ends up with legs and one wing touching the glass and one wing up in the air, not unlike a glider sitting on the tarmac. I then batch process the uncompressed raw scan files with Noise Ninja. I do noise removal (probably unnecessary, because the scanner is not particularly noisy) and sharpening. The sharpening parameters I use are 305% at a radius of 1.2 pixels. This brings out a lot of fine detail in the scales. I found the results I get with NoiseNinja were superior to the sharpening I could get either from the Epson scanner software or from Photoshop. The sharpened files are then read into Photoshop CS, converted from the scanner's profiled colour space to Adobe RBG, annotated with collection and scan data, and saved out as full resolution LZW compressed TIFFs and JPEG (the latter in sRGB color space). People wonder how much time and disk space this all takes. Doing the math: 4800 pixels/inch (1890 pixels/cm) is 23 megapixels/square inch (3.57 megapixels/square cm). A 8-bit RGB scan at this resolution produces 69 megabytes/square inch (10.71 megabytes/square centimeter). 1 inch (25 mm) across in 3:2 aspect ratio (0.66 square inches): 46 megabytes; 2 (50 mm) inches across (2.66 square inches): 183 megabytes; 3 inches (75 mm) across (6 square inches): 414 megabytes; 4 inches (100 mm) across (10.66 square inches): 736 megabytes. So uncompressed TIFF file sizes can get pretty big. Fortunately, LZW lossless compression reduces these TIFF files to about 1/5th of this size. A typical night's catch will yield 1-3 gigabytes of sharpened, compressed raw scan files, which I archive on a DVD-R. The pinning might take me about an hour all told; the unpinning and image capture might take another 2-4 hours total. Processing a single raw moth image into an exhibition-quality image is extra. Not every specimen scan yields something useable. There are many opportunities to damage a fresh specimen: capture and killing; pinning; unpinning; the scanning process; damaged in flipping. Sometimes one of the wings sags because the moth wasn't thoroughly dried. And sometime (more often than I'd like) the moth does not lay flat enough on the glass, resulting in one wing being slightly out of focus. Most flatbed scanners have a depth of focus, and objects go out of focus the same way they do with camera and lens. It's not until I have the raw scan file open in Photoshop at 100% magnification that I can see what I have actually captured. Producing the finished moth imagesThe first step with each image is to identify it. My main reference books are Handfield Papillons du Quebec and Covell A Field Guide to Moths of Eastern North America (2nd edition). Googling for the latin species name is a great way to find what's already out there. Online, I regularly consult Bob Patterson's Moth Photographers Group web site. I embed the species name, common name, Hodges number in the file. I then go through a series of processing steps. I rotate the image to level it. I center it and clip it to a 3:2 aspect ratio with 5% black around. I erase the background to jet black (0,0,0). I then proceed to remove dust and loose scales, and repair minor damage to the wings and bodies (including the pin holes I made in the wings). For large moths this takes several hours of fiddly retouching; I can do a small moth in good condition is less than half an hour. I do all the retouching on the original resolution image to ensure that it looks its best regardless of how big I print it. Once its picture perfect, I save the file, and will make all further changes on copies made from this file. To make a print of a given size, I resize and resample it (Bicubic Smoother) to 360 dpi, and then sharpen it (USM 150% radius 1/200th inch). I generally include a caption on the lower left of the print with the details. Including the particulars, including the date and location the specimen was collected, helps to keep the image particular. Rather than being just a glorious creature that anyone could have caught, this is a glorious creature that I caught on a very specific date in a very specific location. For the people of Ottawa, where I happen to catch my moths, this gives the images a special significance. These are our moths. They're nearby. Look around you. I feel the message would not nearly as strong if I were to represent them as generic moths that can be found is eastern North America. And while I could probably catch most these same species near Montreal, or Toronto, or Boston, or New York City, I didn't. But I can vouch personally that they're here in Ottawa. I'm often asked how accurate the colours are. I've taken pains to make the images as accurate a representation as I can. One of the convenient things about photographing with a flatbed scanner is that lighting and exposure are quite repeatable. I've built an ICC profile that characterizes my scanner, and follow a colour-managed work flow right through to final print or web image. Because of accidents of bad lighting, we almost never get to see these creatures up close under decent light. My aim is to remedy this, and to bring them out into the light. And, yes, they really are this beautiful in real life. Producing fine art printsFor small prints under 17x22" I use an Epson 3800 inkjet printer (17" bed). My preferred paper stock is Epson Velvet Fine Art. For large prints up to 40x60" I use an Epson 9800 inkjet printer (44" bed) and print on Epson Ultrasmooth or Epson Hot Press Natural. Both printers use the same Epson Ultrachrome K3 pigmented ink set with excellent stability on these papers (Wilhelm Research report). The resulting prints have rich blacks and look so 3-dimensional that the viewer's initial impulse is to reach out and touch it. The prints would lose this 3-d feel if mounted behind glass, so I instead use a deep shadow box type frame without glass. I'd prefer to live with a few scuffs on the print that deprive viewers of the full impact. (See the Prints page to get an idea of the level of detail that can be seen in the large prints.) |